

Step 1: Set Up Your File
-
Open your design file (preferably a print-ready PNG with transparency).
-
Convert the design into a layer if it isn’t already.
-
Add a background layer that matches your shirt color—for example, black.
Step 2: Duplicate and Convert to CMYK
-
Go to Image > Duplicate to create a copy of your file.
-
In the duplicate, go to Image > Mode > CMYK Color.
-
When prompted, choose Do Not Flatten.
You'll now be working in the CMYK version of your file.
Step 3: Remove CMY Channels
-
Make sure you’re working on the design layer (not the background).
-
Go to Image > Adjustments > Levels.
-
Open the Channels panel and individually:
-
Select Cyan, drag output level to 255.
-
Select Magenta, drag output level to 255.
-
Select Yellow, type 255 into the output level box.
-
This leaves only the Black (K) channel.
-
Now go to the Black channel and:
-
Drag the black input level to the right to deepen blacks.
-
Adjust the midtones slider (middle one) leftward to lighten grays.
-
Fine-tune until satisfied.
Step 4: Add a White Background Temporarily
-
Select your background layer.
-
Go to Edit > Fill, then choose White to fill the background.
This helps visualize your edits better.
Step 5: Create a 100% Black Fill
-
Go back to your design layer.
-
Open the Channels panel.
-
Ctrl + Click on the Black channel to select all visible pixels.
-
Go to Select > Inverse to invert the selection.
-
Create a new layer above the design layer.
-
Set your foreground color to 100% black in CMYK (100C/100M/100Y/100K).
-
Go to Edit > Fill > Foreground Color.
-
Go to Select > Deselect.
You can now delete the original design layer—you only need the newly filled black layer.
Step 6: Convert to Grayscale and Bitmap
-
Go to Image > Mode > Grayscale and choose Flatten.
-
Then go to Image > Mode > Bitmap.
-
Set resolution to 300 dpi.
-
Choose Halftone Screen as your method.
-
Halftone Settings:
-
Frequency: 27 lines per inch (15–35 is typical)
-
Angle: 45°
-
Shape: Round (you can experiment with ellipse, square, etc.)
Now your image is halftoned—zoom in to see the dots!
Step 7: Transfer Halftone to Original File
-
Select All (Ctrl+A), then Edit > Copy your bitmap halftone image.
-
Close the bitmap file—no need to save.
-
Go back to your original file and paste the copied halftone layer.
-
It will align perfectly with your canvas.
-
Step 8: Apply Threshold and Mask
-
Make sure the halftone layer is selected.
-
Go to Image > Adjustments > Threshold and set it to 128.
-
Open your Channels panel, Ctrl + Click on the RGB channel to select all visible black pixels.
-
Turn off the halftone layer visibility.
-
Select your original design layer below.
-
Click the Add Layer Mask button to apply the selection.
Now your halftone pattern is applied directly as a mask to your design.
Step 9: Final Steps and Saving
-
Delete or hide all extra layers, keeping only the masked design layer.
-
Save your file as a transparent PNG or PDF depending on your printer’s requirements.
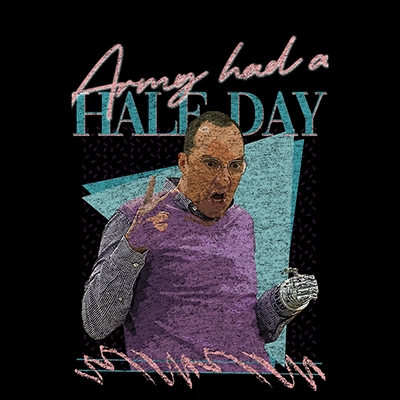
It may look odd on screen, but once printed on a shirt, the shirt’s black color will replace the non-printed areas, creating a soft and professional halftone effect.
Final Result Preview
When you apply the transfer to a black shirt, the missing black from your design blends with the shirt, creating a smooth, breathable result without a heavy, plasticky print feel.
Tips & Notes
-
Halftoning takes practice. You might need a few tries to get the tones just right.
-
Use this method only for black or dark shirts where the shirt replaces printed black.
-
Always confirm with your print shop about format and resolution requirements.


Comments
0 comment